How to Add Piping to Your Posie
Posted by Angie CHIA on
I’m Angie from Peony Patterns (you can find me on instagram @pocketful_of_rainbows88 ), and today we are sharing how to add piping to the Peony Patterns Posie dress. This dress features a split bodice that meets up with a gorgeous curved pocket, and a wonderful way to highlight this feature is to add a pretty pop of piping! Piping is such an easy decorative detail to add to any item of clothing and can really elevate your finished garment from homemade to handmade.
You will need:
- Piping of your choice
- Pins / clips
- An iron and sewing supplies
Instructions:
- Cut your fabric pieces as per the instructions in the Posie tutorial.
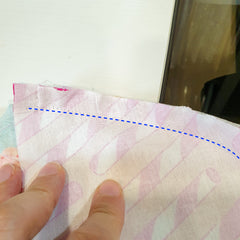
- Pin or clip your piping to the curved side seams of your centre front bodice main piece of your Posie. Check that the piping cord is sitting outside of your seam allowance (in this case the seam allowance is 1/2", so you want the cord portion to sit around 5/8" from the curved raw edge). Baste the piping in place using a 3/8” (1cm) seam allowance.


- Optional: To avoid creating a bulky seam at the waist, trim the cord inside the piping fabric by 3/4” (19mm). Place a pin approximately 2'' (5cm) from the end of piping cord to hold the piping fabric in place. Use a pair of tweezers to pull the cord out from the piping and trim off approximately 3/4” (19mm) or the part that will end up in the seam allowance. Gently move the fabric a little so that the end of the cut piping cord will retract back into the piping. Remove the pin.


- Pin or clip your side front bodice piece right sides together with the main bodice as per the steps in the tutorial. You are now sandwiching the piping between the centre front bodice and side front bodice pieces. Using a 1/2" (1.3cm) seam allowance sew the piping in place, keeping the stitch line as close to the piping as possible. It is very helpful to use a zipper foot to allow you to get nice and close!

- Trim the seam allowance as per the instructions and press the seam allowance towards the bodice. Topstitch.
- Repeat for the remaining side of the bodice.
Voila! You have successfully attached piping to your bodice.

Have fun experimenting with all the different ways to piping on your next garment! Be forewarned, adding piping can be very addictive!
Happy Sewing!!
𝒜𝓃𝑔𝒾𝑒 xx