How to Add a Mandarin Collar to your Camellia Dress
Posted by Angie CHIA on

Hi Everyone, this is Angie from @pocketful_of_rainbows88 and Peony Patterns. If you need a sweet mandarin collar dress that's quick and easy to make, here's a tutorial on how to draft and construct a mandarin collar for your Camellia Dress.
With the Chinese New Year celebrations around the corner, some of us celebrating the occasion are frantically sewing up new outfits for our children. Why do we wear new clothes on Chinese New Year? It's believed that wearing new clothes from head to toe means a new start and fresh hopes for the New Year. Even better if it's in red since it is an auspicious colour!

In this blog, I’m sharing 2 options for the hack.
- Option 1: Simple Version - Adding a Mandarin Collar. This is a more beginner friendly option - i.e. drafting a mandarin collar to add to your dress.
- Option 2: Adventurous Version - Split Bodice. This is a slightly more advanced option for the adventurous confident beginner as it requires precision sewing and easing of curves using a split bodice in addition to a mandarin collar.
Option 1 - Simple Version - Adding a Mandarin Collar
Drafting your Mandarin Collar
-
Print and assemble your Camellia Dress bodice pattern pieces.
-
Mark the seam allowance of the front and back neckline on your bodice piece. NOTE: Accuracy is important here as this will affect the measurement and fit of your mandarin collar.

- Measure the front and back neckline as shown and note down the measurements. Take the measurement from the centre front to the shoulder seam for the front neckline. For the back neckline, start at the notch to the shoulder seam.

In my example, my front neckline measures 4 1/2” while my back neckline measures 4”.
Total neckline = Front + Back - (2 x seam allowance)
-
Draw a straight line across a piece of A4 or letter size paper and mark a dot for your starting point (a) and mark another point at 7 1/2” (b).


-
Draw 2 perpendicular lines from point (a) and (b) about 1” height. Mark 3/4” from point (b) on the perpendicular line (point c).

-
Mark 3/4” up from point (a) to get point (d) and draw a line to join point (d) and (c). This will be your finished height of the collar. *NOTE: I prefer a lower collar for children but you are free to raise the height of the collar to your preference.

-
Next, mark your shoulder seam on the neckline. In our example, the back neckline is 4” with 1/2” seam allowance, so the back neck measurement should be 3 1/2” (i.e. 4” minus 1/2”). Mark 3 1/2” from your centre back (point b) for your shoulder seam notch (e).

-
Mark 3/8” ** straight up from point (a) to introduce a curve to your collar. This will be your point (f).
** Tip: If you prefer your collar with a bit more curve, you can raise this point. I wouldn't raise it more than 5/8" for a child's collar and definitely try it out on a muslin before cutting into your fancy fabrics.
-
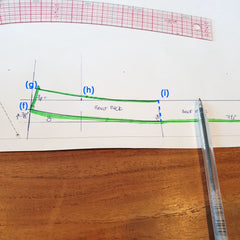
Draw a curved line to join point (e) and (f) and draw a line perpendicular from point (f) up by 3/4" ** for the collar height (point g).
** Tip: If you prefer a collar with more height, you can raise this point. I wouldn't recommend going higher than 1 1/4" as it may feel restrictive especially for the younger kids.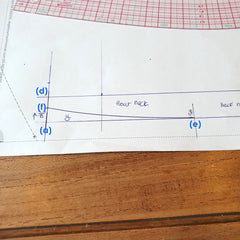

-
Draw a curve from point (g) to the shoulder seam at point (i). This should be parallel to the (e) and (f). This will be your new front neck for your collar. Measure and mark 1 1/2” from point (g) and mark it as point (h).

-
Draw a curve from point (f) to (h) to complete your mandarin collar. I went for a gentle curve using a very technical sewing tool - the handle of my scissors. Next add your seam allowance all around and grainline arrows. The collar should be cut at a bias, hence note the X marked on the pattern piece for grainline.

-
I prefer to sew a curve on a small seam allowance so I’m using 1/4” seam allowance for the top of the collar and 1/2” for the centre back and at the neckline of the collar.
 n
n -
Cut out your collar pattern piece and mark the shoulder seam notch on the pattern piece.

-
Optional: You may wish to indicate the cutting instructions on the collar pattern piece. Cut 2 mirrored pairs (main and lining) on your pattern piece.
Preparing your Mandarin Collar
-
To determine how much fabric is required to cut 2 pairs of mirrored collar pieces, I fold my fabric at a right angle wrong side together and place my collar pattern piece to estimate the required yardage. Cut the fabric square as needed.

-
As the collars are cut on the bias, you’ll need to stabilise the collar pieces. Rather than cutting 4 pieces of interfacing using your collar pattern pieces, I would recommend that you block fuse your interfacing to the wrong side of your fabric before cutting out the collar pieces. The measurements of the interfacing would be the same as the fabric.

-
Press and fold your fabric at the bias (as shown) and cut your collar pieces. You should cut 2 pairs of collars (mirrored) - 1 set of main and 1 set of lining. In my example, I used the same fabric for lining and main. ** Ensure that you have transferred your markings for the shoulder notch to the fabrics on the wrong side.


-
Note: *I prefer to use a knit interfacing as it adds structure without the bulk or stiffness and is therefore more comfortable to wear. However, you may also use a lightweight interfacing for your collar.
Constructing your Mandarin Collar
-
**Locate one of the main and corresponding lining collar pieces, ensuring to take note of the front, back and shoulder notch/markings. Align the shoulder notches and the raw outer curved edges. Pin in place along the top edge. Sew to attach.
Tip: Shorten the stitch length to assist in achieving a smoother curve.

-
Where the seam allowance is 1/2”, trim the seam allowance to 1/4” along the stitched edges only - do not trim the unsewn curved inner edge. Alternatively, pinking shears can be used. Where the seam allowance is 1/4”, clip or notch the seam allowance evenly being careful not to clip through any stitching.


-
Turn the collar right side out. Press, either gently smoothing and shaping out the rounded collars or gently pressing out the sharp collar (at the centre back). Baste the neckline at 3/8”. Topstitch using a 1/8” seam allowance.


-
Repeat for the remaining collar pieces. Set aside. If the simple version is being sewn, skip to the section titled ‘Attaching the Collar’.

Tip: Clipping the seam allowance of the piping will assist in easing it around the collar. Be careful not to clip through any stitching.
Option 2 - Adventurous Version - Split Bodice
Drafting the Split Bodice
-
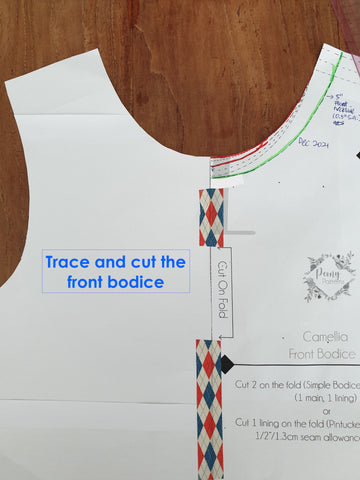
Trace and cut your front bodice pattern piece onto a fold of paper.
-
Mark the seam allowance of the front neckline on your bodice piece and the center of the front neckline (CF).


-
Measure 1 1/2” down from the bottom of the left armscye of your new Front Bodice piece and mark with an 1/2” line. This will be your point ab.

-
Draw a gentle S sharped curve to join CF and point ab. If you have a French Curve ruler, you could draw the curve with your French Curve ruler. Alternatively, you could draw a gentle curve on a freehand or trace using a cereal bowl. Transfer the grainline to the side panel. Be careful that your drawn curve does not extend into the seam allowance at the neckline especially when you add piping to it.
Tip: A gentle curve will be easier to ease and subsequently sew your split bodice.
Note: Add a few notches / marks along the curve across the curve. This will assist in checking your alignment during the construction process.


-
Cut out your new Front Bodice pattern pieces.

-
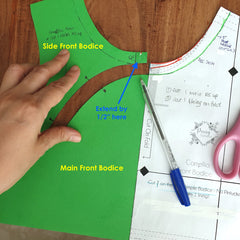
Extend the side Front Panel piece at the center front by 1/2”. Paste the side Front Panel to another paper and add seam allowance to the curved seams. Extend the notches / marks on the curved seams to the seam allowance. Cut the new side Front Panel pattern piece.


-
Repeat the same (i.e add seam allowances) to the Main Front Panel piece at the curved seams and ensure that the notches / marks extend into the seam allowance. Cut the new Front Panel pattern piece.


-
This is the ideal time to check that your curved split bodice fits with the added seam allowance. Slide the pieces together at the notches. They should fit perfectly. Woohoo!


Preparing and Constructing the Split Bodice
-
Cut your main bodice pieces (1 each) with the fabric facing right side up. Don’t forget to transfer the notches / marks across to the fabric. HIGHLY RECOMMENDED: Staystitch around the curved edges of each pattern piece such as the side split, neckline and armscye, to prevent distortion/stretching of the fabric.


-
Follow the cutting checklist on page 14 of the Tutorial instructions for the remainder pieces for the lining, sleeves and dress skirt. Tip: Now is an ideal time to add piping onto the Main Front panel at the curved seams. Refer to our blog on how to add piping here.
Clipping the seam allowance of the piping will assist in easing it around the curved seam. Be careful not to clip through any stitching.

-
Locate the side Front Panel and place it over the Main front bodice, right sides together. Align and Pin at the neckline and the side seams before slowly easing the rest of the side front panel into the curve of the main front bodice. HIGHLY RECOMMENDED: Pin at the seam line of the curve to ensure accuracy.
Sew to attach. Check that there’s no puckers or pinched fabric being sewn. Trim the seam allowance to 1/4”. Alternatively, pinking shears can be used.


-
Press the seam allowance down towards the waist. Topstitch the seams using a 1/8” seam allowance. Note: Be careful as you topstitch towards the center of the front neckline, check that the center front seam allowance of the side panel is not accidentally folded under. We need the seam allowance for attaching the collar.


Attaching the Collar
-
Prepare and complete the bodice following the section titled “Preparing the Bodice - All Options” in your Camellia Dress instructions.
-
To attach the collar, place the bodice main right side up. Along the neckline, measure 7/8” in from the centre back of each of the back bodice pieces. Place a mark along the raw edge of the neckline at this point, using removable sewing marker. Alternatively, use the provided notch on the back pattern piece. In addition, mark the centre of the front neckline.


-
Locate the previously prepared set of collars. Place one of the collar pieces on the corresponding side of the bodice, aligning the raw edge of the collar with the raw edge of the neckline. The lining side of the collar will be touching the right side of the bodice. Match the front of the collar to the centre of the front neckline, the shoulder notch on the collar to the shoulder seam and back edge of collar to the mark created in the previous step. Pin in place.


-
Gently ease the collar around the neckline and continue to pin in place, being careful not to stretch the neckline. Baste in place using a 3/8” seam allowance, ensuring that the front of the collar lines up perfectly with the centre front of the neckline. Tip: If you are sewing the split bodice version with piping, this is the ideal time to check that your collar placement. Be careful to match the piping on the split bodice where the collar meets at the center front.


-
Repeat for the remaining side. The collars fronts should meet at the seam allowance point - being 1/2” down from the neckline. This will ensure that once the lining is attached, the visible collar fronts will meet exactly in the middle. It is recommended to double check that this measurement is correct before proceeding. Adjust if necessary.


-
Follow the tutorial instructions from Page 50 to 55 for completing the bodice. IMPORTANT NOTE: DO NOT UNDERSTITCH the entire neckline seam allowance on the last paragraph of page 51. Your collar will not be able to stand if you understitch the seam allowance to the lining.

-
Follow the tutorial instructions for completing the dress on pages 56 through to 89 .


Congratulations! Your Camellia Dress Hack is now complete. Share on social media using the hashtags #peonypatternscamellia #peonypatterns #CamelliaDress #CamelliaDressHack
#peonypatternscamelliahack #qipao #cheongsum #girlscheongsum #kidscheongsum #kids #girls
Happy Sewing!!
𝒜𝓃𝑔𝒾𝑒 xx
Share this post
- Tags: Add Mandarin Collar, Adding a mandarin collar, Camellia Dress Hack, cheongsam, CNY Dress, DIY mandarin collar, DIY Split Bodice for Cheong Sum, Draft a collar stand, Free pattern mandarin collar, Girl Cheong Sum, Girl Mandarin Collar Dress, girls, kids, Lunar, Lunar QiPao, Pattern Hack, qipao