Ixora Pouch - How To Make Your Own Pouch
Posted by Angie CHIA on

Hi Everyone, this is Angie from Peony Patterns (you can find me on instagram @pocketful_of_rainbows88). Today, we are going to show you how to make a pouch to hold all your knick knacks (especially your embroidery notions). I have included 3 sizes, pencil case, small and large. The small pouch is able to fit a pair of child size shoes (e.g. US9.5) for my daughter as well as a 7 1/2" (19.1cm) embroidery hoop.
This is a quick and easy pouch with enclosed seams. Some techniques used in this tutorial include sewing a facing, French seams and sewing with zippers.

The finished sizes of the pouches are approximately as follows:
|
Size |
Imperial (L x W) |
Metrics (L x W) |
|
Pencil |
8 1/2" x 6" (expanded height of 2") |
21.6 cm x 15.2 cm (expanded height of 5.1 cm)
|
|
Small |
12 1/2” x 7 1/2” (expanded height of 3”) |
31.8 cm x 19.1 cm (expanded height of 7.6 cm)
|
| Large |
13 3/4” x 9 3/4” (expanded height of 4”) |
34.9 cm x 24.8 cm (expanded height of 10.2 cm) |
How to construct the Ixora pouch
Fabric Recommendations: Medium weight woven fabrics, including poplin, linen, lightweight canvas, nylon taffeta, waterproof Oxford canvas, ripstop fabric, laminated cotton/poplin, etc.
* For waterproof fabric, you might find it useful to use a Teflon foot to sew on the sticky side of these fabrics and a ballpoint needle. Optional: A walking foot might be helpful for some fabrics, as it helps to feed the fabric smoothly without any drags, glitches or stops.
Notions:
- Iron / Ironing Board,
- Scissors / Rotary Cutter,
- Sewing Needles (Denim or Microtex recommended for thick fabrics),
- Pins / Clips,
- Ruler /Tape Measure,
- Zipper (YKK #3 or #5 - nylon coil zipper, refer to cutting chart for appropriate length needed for each size)*,
- Zipper foot.
* You can use zipper tape or trim a longer YKK zipper to size if you do not have the exact length.
Fabric Requirements: Based on 44” (112cm) wide, non-directional fabric. This pouch uses up to 1/2 yard (45cm) fabric.
*Optional - for a more structured pouch, about 1/2 yard (45 cm) of lightweight fusible interfacing is recommended (e.g. Pellon SF101 or equivalent).
Download the printable pieces HERE or use the cutting chart below:
Print Layout
For detailed information on printing this pattern, click the interactive hyperlinks below. FAQ can be found on the Peony Patterns website:
How Do I Print My File Correctly?
Printing with layers
How Do I Assemble the Pattern?

Cutting Charts
Inches – Imperial
| L x W | Zipper Length (1 pc) |
Pouch Pieces (Cut 1) |
Zipper Tab (Cut 1) |
Loop Handle* (Cut 1) |
Pull Tab* (Cut 1) |
Facing (Cut 2) |
| Pencil Case |
7" | 9 1/2" x 16" |
4" x 1" | 8" x 3" | 2" x 1 1/2" | 9 1/2" x 1 1/2" |
| S | 12" | 13 1/2” x 22” | 2 1/2” x 1” | 8" x 3" | 2" x 1 1/2" | 13 1/2” x 1 1/2” |
| L | 14" | 14 3/4” x 28” | 2 1/2” x 1” | 8" x 3" | 2" x 1 1/2" | 14 3/4” x 1 1/2” |
Centimetres - Metric
|
L x W |
Zipper Length (1 pc) |
Pouch Pieces |
Zipper Tab (Cut 1) |
Loop Handle* (Cut 1) |
Pull Tab* |
Facing (Cut 2) |
| Pencil Case |
17.8 | 24.1 x 40.7 | 10.2 x 2.5 | 20.3 x 7.6 | 5.1 x 3.8 | 24.1 x 3.8 |
|
S |
30.5 |
34.3 x 55.9 |
6.4 x 2.5 |
20.3 x 7.6 |
5.1 x 3.8 |
34.3 x 3.8 |
|
L |
35.6 |
37.5 x 71.1 |
6.4 x 2.5 |
20.3 x 7.6 |
5.1 x 3.8 |
37.5 x 3.8 |
* Tip: If you are using cotton twill tape or grosgrain ribbon for the loop handle and pull tab, cut the length according to the cut charts.
** NOTE: If you are using directional fabric, be careful to check that you cut the length parallel to your selvedge.

Cutting Checklist
Pattern Pieces
Cut 1 pouch piece (1 main)
Cut 1 zipper tab piece (1 main)
Cut 1 pull tab (1 main / contrasting fabric)
Cut 1 loop handle piece (1 main / contrasting fabric)
Cut 2 facing pieces (2 main / contrasting fabric)
*Optional for lightweight fabrics:
Cut 1 lightweight fusible interfacing (e.g. Pellon SF101 or equivalent) using the pouch piece
Preparing your Zipper and Zipper Tab
- Start by preparing your zipper and zipper tab. Trim your zipper to 1/4” (6mm) BEFORE the metal stop and sew a zigzag stitch 1/8” (3mm) above the new trimmed edge of the zipper.
Tip: If you have a zipper that is longer than the prescribed length, you can trim the zipper down to the necessary length. Based on your pouch size, measure and mark (per the table below) from the metal stopper at the zip opening and sew a tight zigzag stitch on the mark. A wide zigzag stitch with a short stitch length setting would work best, center the zipper under your footer before you start your zigzag stitch.
| Size | Measure and mark from the metal stopper at the zip opening |
| Pencil Case | 7" |
| Small | 11 5/8" |
| Large | 13 5/8" |
| Size | Trim to length |
| Pencil Case | 7 3/4" |
| Small | 12 5/8" |
| Large | 14 5/8" |


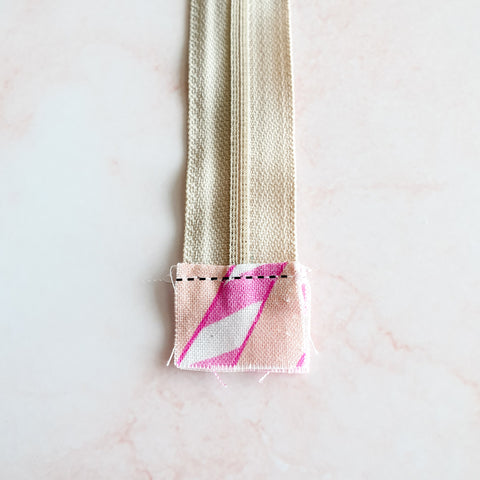
- Fold the zipper tab piece in half lengthwise, right sides together. Press to create a memory crease.

- Slide the zipper tab over your newly trimmed edge of your zipper and clip/pin to hold in place. Sew together at 3/8” (10mm) seam allowance.

- Fold the zipper tab pieces back and finger press before top stitching at 1/8” (3mm) from the folded edge.

- Optional: Prepare your fabric by pressing your fusible interfacing to the wrong side of the main fabric for a more structured pouch. To reduce bulk, trim the seam allowance away on the interfacing before fusing.
Preparing your Pull Tab and Loop Handle
- Fold the Pull Tab piece in half lengthwise, right sides together. Press to create a memory crease. Unfold.

- Fold the outer edges in to the centre crease, wrong sides together. Press.

- Fold the fabric on the short edges together and press to create a sharp crease. Pin / clip in place.


- Edgestitch along the folded edges on 3 sides to close the pull tab. Set aside.

- Fold the Loop Handle piece in half lengthwise, wrong sides together. Press to create a memory crease. Unfold.

- Fold the outer edges in to the centre crease, wrong sides together. Press.

- Fold the fabric in half again and press to create a sharp crease. Pin/clip in place.

- Edgestitch along the open folded edge to close the loop handle strap. Set aside.

Constructing the Pouch
Preparing the Facing and Main Pouch Pieces- Fold one side of the facing piece lengthwise by 1/2” (13mm), wrong sides together. Press to create a memory crease. Set aside. Do the same to the remaining piece.

- Fold the pouch piece in half on the widthwise, wrong sides together. Press to create a memory crease. Unfold. Mark the centre with tailor’s chalk or washable fabric pen.

Attaching the Zip and Facing
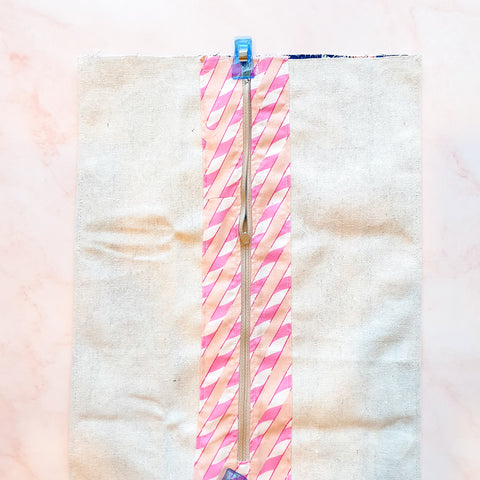
- Align the shorter straight edge of the pouch piece with zipper right sides together. Pin / clip in place. * Tip: If you find that your prepared zipper is slightly shorter than the length of the pouch, center the zipper on the pouch length.
- Unzip the zipper halfway before sewing. Baste at 1/4” (6mm) with your zipper foot until about 1 inch (2.5cm) before your zipper pull.
-
Stop with your needle down in your fabric. Raise your footer and pull the zip all the way clear of the footer. Lower your footer and continue sewing until your zipper is completely attached.
Tip: You may need to raise your footer higher to maneuver the zipper pull past the footer.


- Place the unfolded edge of the facing and align the right side of the facing to wrong side of the zipper tape. Pin / clip in place and unzip the zipper halfway. Sew to attach at 1/4” (6mm) with your zipper foot until about 1 inch (2.5cm) before your zipper pull. Stop with your needle down in your fabric.


- Raise your footer and pull the zip all the way clear of the footer. Lower your footer and continue sewing until your facing is fully attached.
Tip: You may need to raise your footer higher to maneuver the zipper pull past the footer.


- Fold the main fabric and facing back and press. Take care to ensure that the folded edge of the facing remains intact.
- Edgestitch at 1/8” (3mm) on the right side.


- Turn over the pouch piece and edge stitch from the folded edge of the facing at 1/8” (3mm) from the wrong side of the fabric (right side of the facing).


- To attach the zipper on the other side, close the zipper and fold the pouch fabric right side together to meet the other edge of the zipper tape. Pin / clip in place. Baste at 1/4” (6mm).

- Then align the unfolded edge of the remaining facing to the wrong side of the zipper tape. Pin / clip in place and sew at 1/4” (6mm) seam allowance with your zipper foot.


- Fold the main fabric and facing back wrong sides together and press. Repeat edge stitching at 1/8" on the right sid as before.


- The zipper tape might extend longer than your pouch length. Open your zipper midway. Trim off the excess tape above the pouch length and pin the zipper tape together, being careful to align the metal stops. Center the zipper under your footer and use a wide zigzag stitch with a short stitch length to stitch the tape together 1/8" (3mm) from the edge.


Making the Pleats
- Turn your pouch wrong side out and align the zipper to the middle, meeting your centre marked previously during the preparation. Pin / clip the top and bottom of the pouch to hold it in place.


- Press the sides well to mark the 2 fold lines. Edge stitch 1/8” (3mm) from the folded edges.

- Measure and mark the pleats according to the table below. Mark with pins, tailor’s chalk or washable fabric pens.
| Size | Mark |
| Pencil Case | 1" (2.5 cm) from the folded edges on both sides |
| Small | 1 1/2" (3.8 cm) from the folded edges on both sides |
| Large | 2" (5.1 cm) from the folded edges on both sides |

- Turn the pouch right side out. Push the edge stitched fold inwards towards the wrong side and stop at the marked lines for the pleats so that the edge stitched seam is sandwiched in between. Press well to create a crease and pin in place. Do the same for the other fold.


- Pin / clip the raw edges on both sides of the pleats and baste at 1/8” (3mm) on both sides to secure the pleat.

Attaching the Zipper Pull and Loop Handle
- Centre the zipper pull piece to the bottom of the zipper. Pin / Clip in place. Sew at 1/8” (3mm) to attach.

- Measure and mark according to the table below. Ensure that you made the mark at the edge where the top of the zipper is. Pin / clip the loop handle, one on each of these marks and check that the loop handle is not twisted. Sew at 1/8” (3mm) to attach.
| Size | Mark |
| Pencil Case | Measure 1" (2.5cm) from the zipper on both sides of the zip and mark |
| Small | Measure 2” (5.1 cm) from the zipper on both sides of the zip and mark |
| Large | Measure 2” (5.1 cm) from the zipper on both sides of the zip and mark |


- Pin / Clip the unsewn edges with the fabric wrong sides together and sew to attached using 1/8" (3mm) allowance.


- Important!!! Check that the zipper is unzipped. Turn the pouch out on the wrong side. Gentle press out the corner and press well.


- Sew at 3/8” (10mm) from the top and bottom of the pouch on the wrong side. Be careful to pin your loop handles so that they are not twisted. Viola! You have just completed a french seam and enclosed your raw seams.


Congratulations! Your Ixora Pouch is now complete. You now have a lovely pouch to hold all your embroidery notions for your sewing on the go!


Share on social media using the hashtags #ixorapouch #peonypatterns #peonypatternsixora
Happy trails and sewing!
𝒜𝓃𝑔𝒾𝑒 xx
Share this post
- Tags: Free Pattern, Free Pouch, Gift Ideas, Ixora Pouch, Peony Patterns Freebie, Popcorn Pouch, Pouch, Stocking Stuffers