How to Enclose the Honeysuckle Sleeve!
Posted by Jodie Pascoe on

Hi everyone,
Its Jodie from Peony Patterns here, today we are sharing how to enclose the sleeve seams on Honeysuckle.
The steps following may seem like the hard way to enclose them, but I promise the more you do it, the easier it becomes!
1/ Construct the main bodice as per the instructions on your Peony Pattern and hem and pleat the sleeves. Construct the lining bodice pieces also and set this aside for the time being.

2/ Take the bodice piece and mark 1.5” (4cm) in from each side seam (a total of four sides).

3/ Gather the sleeve and start pinning into place from the 1.5” (4cm) mark to the other 1.5” (4cm) mark.


4/ Baste into place using 1/4" (6mm) seam allowance. The bodice should now look like this:

5/ Place the bodice lining over the bodice main, right sides together, aligning the shoulder seams. Pin together the neckline and centre back. Sew into place.

6/ Roll the sleeves into the bodice and sandwich between the bodice main and lining. Pin together. Sew into place using 1/2” (1.3cm) Seam allowance, once again ensuring that you leave 1.5” (4cm) unsewn at either end. Repeat for the remaining sleeve.
Tip: Be sure to check there is no bunching or pinching in your fabric as you sew.

7/ Trim 1/4” (6mm) off the seam allowance using pinking shears or clip the curves. This will allow the seam to sit nicely when turned right side out. Be sure not to clip or trim the 1.5” (4cm) unsewn section of the sleeve.

8/ Turn the bodice right side out and press.

This is where it can get tricky! Seam allowance is extremely important for the next few steps, they must be precise.
9/ Find your front main side piece and place together with your main back side piece and pin together. Sew together using a 1/2” (1.3cm) seam allowance. Be sure to keep the lining and sleeve out of the way while you sew.
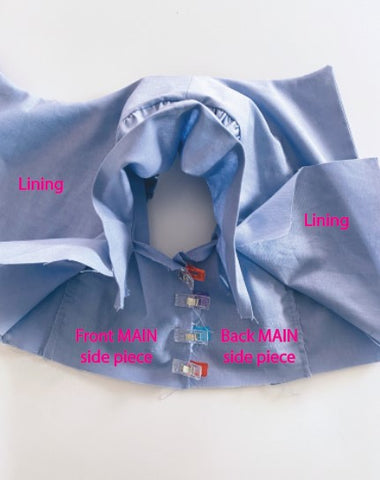
10/ Find both the front and back side-lining pieces and pin/clip into place, ensuring pieces are right sides together. Poke the ends of the sleeve out and away from the lining before you sew. Use a 1/2” (1.3cm) seam allowance.
Tip: Make a small mark with a removable pen/marker on the correct side if needed.

11/ Placing the sides of the sleeve right sides together, pin/clip into place. Sew together using a 1/2” (1.3cm) seam allowance.

12/ Overlock or finish the seam.

13/ open the bodice seams and press.

14/ Line up and clip/pin the three layers into place. If the seam allowance was precise, it should fit together with no puckers.
Sew together using a 1/2” (1.3cm) seam allowance.


15/ Clip the curve.

16/ Turn the bodice the right way out and press. Voila you now have a very professional finish for your sleeves!

Happy Sewing
<3
Jodie
Share this post
- Tags: Enclosing A Sleeve